3D floor plan rendering is the technical process of converting a two-dimensional architectural drawing or CAD blueprint into a photorealistic, three-dimensional spatial visualization using geometry modeling, physically based rendering (PBR) materials, and advanced lighting simulation. The output communicates wall heights, room proportions, furniture scale, material finishes, and spatial flow with a level of realism that flat technical drawings cannot achieve. This discipline sits at the intersection of architectural drafting, computer graphics, and design communication – making it an essential deliverable for real estate developers, architects, interior designers, and construction teams worldwide.
Whether you are preparing a property listing, presenting to investors, or finalizing a design before breaking ground, understanding how 3D floor plan rendering works – and what it can deliver – is essential for anyone serious about modern architectural visualization.
Professionals who need a reliable partner for this process can explore professional 3D rendering and architectural visualization services that transform raw blueprints into compelling, client-ready visuals.
What is 3D Floor Plan Rendering?
At its core, what is 3D floor plan rendering comes down to a single idea: transforming a flat, symbol-based architectural drawing into a richly detailed, three-dimensional visual model that anyone – trained or not – can instantly understand.
A standard 2D floor plan uses lines, hatching, and architectural notation to convey room layout and dimensions. While these drawings are essential for construction, they require technical literacy to interpret. A 3D floor plan rendering solves that communication gap entirely.
Quick Definition:
3D floor plan rendering is the generation of a photorealistic or stylized three-dimensional image from a 2D architectural blueprint, incorporating spatial modeling, material texturing, and lighting simulation.
The rendered output typically shows:
- Walls extruded to their correct heights
- Doors and windows positioned with accurate dimensions
- Furniture and fixtures placed to scale
- Floor materials, wall finishes, and ceiling treatments applied
- Natural or artificial lighting simulated realistically
- Shadows, reflections, and ambient occlusion for spatial depth
The result is a visual that communicates design intent to clients, stakeholders, buyers, and planning authorities – far more efficiently than any flat drawing can.

3D Floor Plan Rendering vs. 2D Floor Plans: Key Differences
Understanding where 3D floor plan rendering fits requires a clear comparison with traditional 2D plans. The distinction goes beyond aesthetics – it directly affects how well design intent is communicated to different audiences.
Comparison Table: 2D Floor Plans vs. 3D Floor Plan Rendering
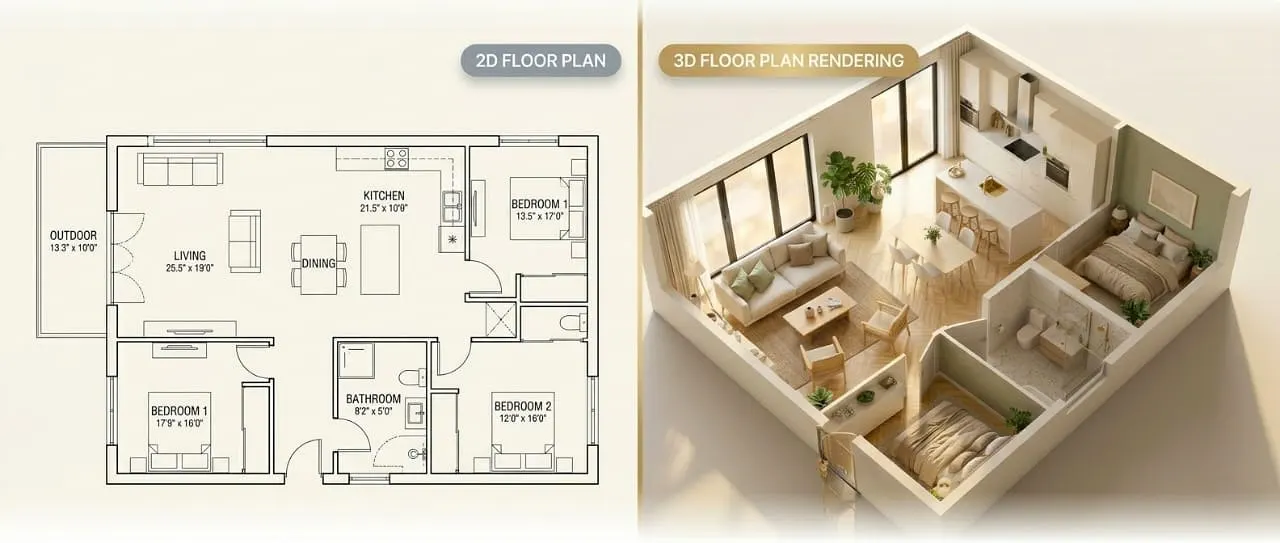
| Feature | 2D Floor Plan | 3D Floor Plan Rendering |
|---|---|---|
| Visual Depth | Flat, top-down only | Full three-dimensional perspective |
| Audience | Architects, builders, engineers | Clients, buyers, investors, planning boards |
| Material Representation | Symbols and notation | Photorealistic textures and finishes |
| Furniture & Fixtures | Outlines only | Scaled, textured 3D models |
| Lighting Simulation | None | Full natural and artificial lighting |
| Spatial Understanding | Requires technical training | Intuitive for any viewer |
| Design Change Visibility | Slow to interpret | Immediately visible |
| Marketing Suitability | Low | Very high |
| Production Time | Fast | Moderate to fast (depending on workflow) |
| Cost | Lower | Moderate to higher |
As the table illustrates, 3D floor plan rendering is not a replacement for 2D plans in technical workflows – it is a communication layer added on top of them, serving a different audience and purpose.
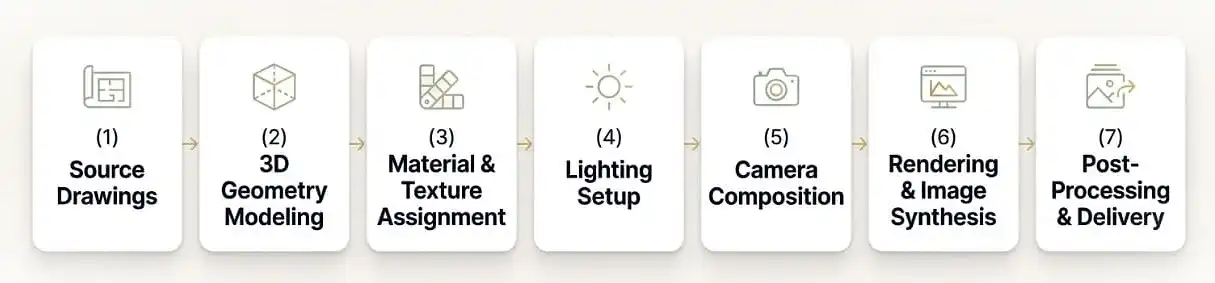
The Step-by-Step 3D Floor Plan Rendering Process
The production of a high-quality 3D floor plan render follows a structured pipeline. Each stage builds on the previous one, and skipping steps almost always results in visible quality issues in the final output.
Step 1: Receiving and Reviewing the Source Drawings
The process begins with the client providing their architectural drawings. These may come in the form of:
- AutoCAD (.dwg) files
- PDF blueprints
- Scanned paper drawings
- Revit BIM models
- Sketches with annotated dimensions
The rendering team reviews these for completeness, checking that all dimensions, ceiling heights, door/window schedules, and material specifications are present. Any missing information is flagged before modeling begins – because corrections later in the pipeline are expensive.
Step 2: 3D Geometry Modeling
Once the drawings are cleared, the 3D modeler extrudes the floor plan geometry in software such as Autodesk 3ds Max, SketchUp, Blender, or Revit. Key tasks at this stage include:
- Extruding walls to the correct heights
- Cutting door and window openings
- Building ceiling structures, soffits, and architectural details
- Importing or modeling furniture and fixture 3D assets
- Verifying dimensional accuracy against the source plans
Precision at this stage is non-negotiable. Scale errors in the model will propagate through every subsequent stage and undermine the credibility of the render.
Step 3: Material and Texture Assignment
With the geometry complete, the team assigns materials to every surface. In modern pipelines, this uses physically based rendering (PBR) materials – a system that defines how surfaces interact with light based on real-world physical properties.
Each material is defined by:
- Albedo (base color): The raw color of the surface
- Roughness: How smooth or matte the surface appears
- Metalness: Whether the surface behaves like a metal or a dielectric
- Normal maps: Simulated micro-surface texture detail (e.g., wood grain, stone texture)
- Specular/Glossiness: Reflectivity under direct lighting
Real-world material libraries from sources such as Poliigon or Quixel Megascans are commonly used to achieve photorealistic results.
Step 4: Lighting Setup
Lighting is arguably the single most important factor separating a credible render from an amateur one. The lighting setup typically involves:
- HDRI environment maps for realistic sky and ambient lighting
- Sun position simulation matched to the geographic location and time of day
- Interior artificial lights modeled as area lights, point lights, or IES profile lights
- Global illumination (GI) algorithms such as path tracing or photon mapping to simulate light bouncing between surfaces
Poorly lit renders make spaces look flat and unconvincing, regardless of how detailed the geometry is.
Step 5: Camera Setup and Composition
Before rendering, the camera is positioned and configured. For a 3D floor plan render, the typical views include:
- Isometric or axonometric overhead view (the classic “dollhouse” perspective)
- 45-degree aerial perspective for spatial depth
- Eye-level interior views of key rooms
Camera settings such as focal length, depth of field, and exposure are adjusted to match the project’s visual tone.
Step 6: Rendering and Image Synthesis
The scene is then processed through a rendering engine, such as:
- V-Ray (industry-standard for architectural visualization)
- Corona Renderer (popular for photorealistic interiors)
- Lumion (fast, real-time architectural rendering)
- Enscape (real-time render integrated with Revit and SketchUp)
- Arnold (common in high-end visual effects workflows)
- Cycles (Blender’s built-in path tracer)
Render time varies from minutes to hours depending on scene complexity, image resolution, and the number of light bounces specified.
Step 7: Post-Processing and Final Delivery
The raw render is brought into Adobe Photoshop or Lightroom for post-processing, which includes:
- Adjusting exposure, contrast, and color balance
- Adding lens effects (bloom, chromatic aberration, vignette) for realism
- Compositing entourage elements such as people, plants, or sky replacements
- Final export at the required resolution (typically 3,000-6,000 pixels wide for print/marketing use)
Types of 3D Floor Plan Renders
Not all 3D floor plan renders look the same. Depending on the project’s purpose, budget, and audience, the rendering style is selected accordingly.
1. Photorealistic 3D Floor Plan Renders
The most detailed and visually accurate style. Photorealistic renders use PBR materials, global illumination, and high-resolution textures to produce images indistinguishable from photographs of real spaces.
Best for: Real estate marketing, investor presentations, luxury residential projects.
2. Stylized / Illustrated 3D Floor Plan Renders
A softer, more graphic style that retains three-dimensional depth while using flatter colors, visible linework, or watercolor-style textures. These renders are highly legible and work well in architectural presentations and planning submissions.
Best for: Client presentations, planning board submissions, design proposals.
3. Isometric 3D Floor Plan Renders
The classic “dollhouse view” – a top-down, angled perspective with no perspective distortion. Every room is visible simultaneously, making this the most spatially informative single image a project can produce.
Best for: Real estate listings, brochures, websites, and buyer-facing marketing.
4. Eye-Level Interior Renders from Floor Plan
Although technically an interior render, this type is produced directly from a floor plan context – showing key room perspectives such as the living room, kitchen, or master bedroom.
Best for: Supplementary marketing visuals, high-value residential and commercial projects.
5. White Model / Schematic Renders
A clean, untextured render (often white or grey surfaces) that emphasizes spatial form and layout without the distraction of materials. Frequently used in early design stages.
Best for: Design development, early client feedback, structural reviews.
Style Comparison Table
| Render Style | Realism Level | Production Time | Best Use Case |
|---|---|---|---|
| Photorealistic | Very High | 2-5 days | Marketing, presales |
| Stylized / Illustrated | Medium | 1-2 days | Presentations |
| Isometric | Medium-High | 1-2 days | Listings, brochures |
| Eye-Level Interior | Very High | 2-4 days | Premium marketing |
| White Model | Low | Half-day | Design review |
Core Technical Components Explained
For those who want a deeper understanding of the technology behind 3D floor plan rendering, here is a breakdown of the key components:
Physically Based Rendering (PBR)
PBR is the current industry standard for 3D material systems. It models how light physically interacts with surfaces, ensuring that materials look consistent and realistic under different lighting conditions. This is why a PBR-textured wood floor looks correct both in direct sunlight and in a dim, artificially lit room.
Global Illumination (GI)
GI algorithms simulate indirect light – the light that bounces from one surface to another. Without GI, 3D scenes look harsh and artificial. With GI, shadows have soft, color-tinted edges, and rooms fill with the warm or cool tones of the materials around them.
HDRI Lighting
High Dynamic Range Imaging (HDRI) maps capture the full luminance range of a real-world environment and project it onto the 3D scene as an omnidirectional light source. This provides natural, convincing ambient illumination with minimal manual setup.
Ambient Occlusion (AO)
AO is a shading technique that darkens areas where surfaces are close together – such as corners, crevices, and joints. It adds a sense of physical contact and weight to objects in the scene, significantly improving perceived realism.
Anti-Aliasing
Renders produced at standard resolution have jagged edges at polygon boundaries. Anti-aliasing smooths these edges through sampling algorithms, producing clean, publication-quality images.
Suggested Infographic Idea: A circular diagram titled “The 7 Core Technical Systems of 3D Floor Plan Rendering” showing: PBR Materials, Global Illumination, HDRI Lighting, Ambient Occlusion, Geometry Modeling, Anti-Aliasing, and Post-Processing – each with a one-line definition.
Who Uses 3D Floor Plan Rendering and Why
3D floor plan rendering is not a niche tool. It serves a broad range of professionals across architecture, real estate, interior design, and construction.
Real Estate Developers
Developers use 3D floor plan renders to pre-sell units before construction begins. A compelling isometric render of an apartment layout on a property listing immediately communicates what the finished product will look like – reducing buyer uncertainty and accelerating sales. According to research in the architectural visualization field, buyers understand spatial flow significantly faster when viewing 3D renders compared to traditional 2D plans.
Architects and Architecture Firms
Architects integrate 3D floor plan renders into their client presentation workflow to demonstrate design intent clearly and win project approvals. Rather than asking a client to interpret a technical drawing, the architect presents a photorealistic render that makes the design instantly understandable.
Interior Designers
Interior designers use rendered floor plans to validate furniture layouts, test color schemes, and present material selections to clients before committing to purchases. Seeing a space in 3D removes the ambiguity that color swatches and flat drawings introduce.
Property Marketing Agencies
Marketing agencies producing brochures, websites, and listing portals rely on 3D floor plan renders as hero visuals. High-quality renders differentiate a listing from competitors using only basic photography.
Construction and Contracting Firms
Contractors use rendered floor plans during the estimating and planning phase to verify spatial relationships, identify potential conflicts, and communicate scope to subcontractors and clients.
Property Management Companies
For renovations, fit-outs, and lease marketing, property managers use 3D renders to visualize proposed changes without committing construction resources.
Key Benefits for Architects, Developers, and Real Estate Professionals
Understanding what 3D floor plan rendering delivers in practice helps justify the investment clearly:
1. Accelerated Client Decision-Making Clients understand a 3D render immediately. There is no need to decode architectural notation or visualize dimensions mentally. Faster comprehension leads directly to faster approvals.
2. Reduced Design Revisions When clients can see exactly what a design will look like, they identify issues and preferences early – before construction begins. This dramatically reduces expensive, late-stage change orders.
3. Higher Quality Marketing Assets Photorealistic 3D floor plan renders produce marketing visuals that compete with – and often exceed – standard property photography, particularly for off-plan and pre-construction projects.
4. Competitive Differentiation In a crowded property market, 3D floor plan renders signal professionalism, quality, and attention to detail. They position a project above competitors still relying on plain 2D drawings.
5. Pre-Sale Revenue for Developers 3D renders allow developers to launch sales campaigns months or years before physical completion, generating presale revenue that funds construction.
6. Planning Authority and Investor Confidence Well-produced renders support planning applications and investor decks by presenting designs with visual credibility that raw blueprints lack.
7. Universal Communication Unlike technical drawings, 3D renders communicate across language barriers and across levels of technical expertise – from a first-time homebuyer to a boardroom of institutional investors.

Common Mistakes to Avoid in 3D Floor Plan Rendering
Even experienced professionals make avoidable errors. Knowing these pitfalls in advance saves time, money, and client trust:
Mistake 1: Inaccurate Geometry from Source Plans
The most common and damaging error. If the source drawings contain errors – incorrect dimensions, unlabeled wall thicknesses, missing ceiling heights – these propagate into the 3D model and undermine every subsequent stage.
Solution: Always request complete, dimensioned drawings and confirm ceiling heights and wall specifications before starting modeling.
Mistake 2: Using Low-Resolution Textures
Low-resolution material textures look flat and artificial, especially in close-up or high-resolution renders. They are one of the fastest ways to make an otherwise solid render look unprofessional.
Solution: Use professional PBR material libraries and ensure all textures are at minimum 2K resolution, with 4K preferred for foreground surfaces.
Mistake 3: Poor or Artificial Lighting
Relying on default lighting setups produces harsh, flat, or overly saturated renders. Natural-looking lighting requires deliberate HDRI selection, sun angle matching, and careful interior light placement.
Solution: Invest time in the lighting setup. It is the single largest contributor to render quality after modeling accuracy.
Mistake 4: Over-Staging the Space
Adding too much furniture, decor, or visual clutter to a render makes it confusing and hides the spatial clarity that a floor plan render is specifically designed to communicate.
Solution: Keep the scene clean and purposeful. Include enough furniture to establish scale and use, but avoid overcrowding.
Mistake 5: Ignoring Camera Composition
A poorly positioned camera can make even a well-modeled and lit render look awkward. The angle, height, and framing of the camera view directly determines how well the spatial story is told.
Solution: Test multiple camera positions and always frame the render so that the most important spatial features – room flow, key living areas, natural light sources – are visible and prominent.
Mistake 6: Skipping Post-Processing
Raw renders from even the best rendering engines rarely look finished without post-processing. Color grading, exposure adjustment, and light touches like lens bloom dramatically improve the final result.
Solution: Always allocate time for post-processing in the production schedule. Even 30 minutes in Photoshop makes a measurable difference.
Expert Tips for Better 3D Floor Plan Renders
These are the techniques that separate professional, studio-quality 3D floor plan renders from generic outputs:
Tip 1: Start with Real-World Scale Always model in real-world units from the very first step. A room that measures 4.2m x 5.6m in the source drawing should be exactly 4.2m x 5.6m in the 3D model. Rescaling after the fact introduces proportional distortions that are difficult to fix.
Tip 2: Match Material Reflectivity to the Space’s Function Kitchens and bathrooms typically have higher specular surfaces (polished stone, gloss cabinets) while living areas and bedrooms use softer, more matte materials. Matching material character to room type increases believability.
Tip 3: Use Three-Point Lighting as a Foundation Even in architectural renders, the three-point lighting model (key light, fill light, rim/back light) provides a reliable starting structure. Build from this foundation before adding environment or secondary lights.
Tip 4: Add Imperfections Deliberately Perfect, pristine surfaces look artificial. Add subtle surface variation through texture maps – small scuffs on wood floors, slight unevenness in plaster walls – to add the organic quality that real spaces always have.
Tip 5: Layer Depth with Entourage Plants, books, cushions, and small decorative objects at different distances from the camera create visual depth and help establish a sense of scale that pure architecture cannot provide.
Tip 6: Render at Twice the Required Resolution Always render at two times the final delivery resolution and then downscale. This process – known as supersampling – removes aliasing and produces cleaner, sharper final images without artifacts.
Tip 7: Request Client Feedback at the Grey Box Stage Before applying final materials and lighting, present a grey-box (untextured) render to the client for spatial review. This is the cheapest point at which to make layout changes.
Tools and Software Used in 3D Floor Plan Rendering
The professional toolchain for 3D floor plan rendering has expanded significantly in recent years, with options available at every skill level and budget:
Modeling Software
- Autodesk Revit: BIM-integrated modeling; preferred for large commercial and complex residential projects
- Autodesk 3ds Max: Industry-standard for high-end architectural visualization workflows
- SketchUp Pro: Approachable, widely used for early-stage and mid-tier architectural rendering
- Blender: Open-source, rapidly growing in professional architectural visualization circles
Rendering Engines
- V-Ray: The most widely used photorealistic rendering engine in architectural visualization
- Corona Renderer: Highly regarded for interior render quality with an intuitive workflow
- Lumion: Fast, real-time rendering with direct integration with SketchUp and Revit
- Enscape: Real-time rendering plugin for Revit, Rhino, SketchUp, and ArchiCAD
Post-Processing Tools
- Adobe Photoshop: The industry-standard for render compositing, color grading, and final delivery
- Adobe Lightroom: Used for efficient batch color grading across multiple render outputs
AI-Assisted Tools (Emerging)
AI-powered platforms are beginning to accelerate parts of the 3D floor plan rendering pipeline – particularly in scene setup, material generation, and style transfer. While these tools are evolving rapidly, human expertise in composition, design intent interpretation, and quality review remains essential for professional-grade output.
According to Autodesk’s official visualization resources, 3ds Max combined with V-Ray remains the benchmark workflow for high-end architectural visualization studios.
3D Floor Plan Rendering vs. Full 3D Architectural Rendering
It helps to understand how 3D floor plan rendering fits within the broader category of architectural rendering:
| Feature | 3D Floor Plan Rendering | Full 3D Architectural Rendering |
|---|---|---|
| Primary View | Overhead / isometric | Exterior facade, streetscape, aerial |
| Focus | Interior layout and spatial flow | Architectural form, massing, and setting |
| Audience | Buyers, interior designers, layout reviewers | Developers, planners, investors, public |
| Common Output | Isometric cut-away view | Photorealistic exterior perspective |
| Complexity | Moderate | High |
| Best Use | Floor plan marketing, interior layout approval | Project marketing, planning approval, investor decks |
In practice, most real estate and architecture projects use both types together. A full 3D exterior render shows what the building looks like from the street; a 3D floor plan render shows what the internal layout looks like when you step inside.
Frequently Asked Questions About 3D Floor Plan Rendering
What is 3D floor plan rendering, exactly?
3D floor plan rendering is the process of transforming a flat, two-dimensional architectural drawing into a photorealistic or stylized three-dimensional visualization. The process involves 3D geometry modeling, physically based material application, lighting simulation, and image rendering – producing an output that communicates spatial layout, room proportions, material finishes, and furniture scale in a way that any viewer can instantly understand.
How long does a 3D floor plan render take to produce?
Production time depends on the size and complexity of the floor plan, the required level of detail, and the rendering style selected. A straightforward isometric render of a single-apartment floor plan typically takes 1-3 business days. A complex multi-level commercial floor plan with photorealistic finishes may take 5-7 business days.
What files do I need to provide for a 3D floor plan rendering?
The minimum requirement is a dimensioned floor plan drawing – typically an AutoCAD (.dwg) file, PDF, or high-resolution scan. Additional information that improves quality includes ceiling heights, door and window schedules, material finish specifications, and reference images for the desired interior style.
How much does 3D floor plan rendering cost?
Pricing varies widely based on project size, render complexity, and studio expertise. For a single apartment floor plan, professional rendering services are typically priced in a range suitable for residential and commercial budgets. For accurate pricing tailored to your specific project, contacting a rendering studio directly is recommended.
What is the difference between a 3D floor plan and a 3D architectural render?
A 3D floor plan render shows the internal spatial layout of a building – rooms, furniture, flow – typically from an overhead isometric perspective. A 3D architectural render shows the external form of a building – facade, massing, landscaping – from an exterior perspective. Both are types of architectural visualization, and most complete projects use both together.
Can 3D floor plan rendering help sell properties faster?
Yes. Research in architectural visualization consistently shows that property listings featuring 3D renders – including floor plan renders – generate higher engagement, more qualified enquiries, and faster conversion compared to listings relying on 2D plans alone. Buyers can visualize the space immediately, which reduces hesitation and accelerates decision-making.
What rendering software is used for 3D floor plan rendering?
The most commonly used professional tools include Autodesk 3ds Max, SketchUp Pro, and Blender for modeling; V-Ray, Corona Renderer, and Lumion for rendering; and Adobe Photoshop for post-processing. The specific toolchain varies by studio and project requirements. For further reading on industry-standard workflows, the National Institute of Building Sciences provides excellent foundational resources on building information and visualization standards.
Is 3D floor plan rendering only for new construction projects?
No. 3D floor plan rendering is equally valuable for renovation and refurbishment projects, fit-out planning, interior redesign proposals, and property management marketing. Any project that involves communicating a spatial layout to a non-technical audience can benefit from a 3D floor plan render.
Why 3D Floor Plan Rendering Matters in Modern Architecture and Real Estate
By now, the answer to “what is 3D floor plan rendering” is clear: it is not simply a prettier version of a floor plan. It is a precision communication tool that translates complex spatial data into visual information that any stakeholder can understand and act on immediately.
For architects, it wins client approvals faster. For developers, it drives presales and investor confidence. For real estate agents, it produces listing visuals that generate engagement and leads. For interior designers, it validates design decisions before a single piece of furniture is purchased.
The quality of a 3D floor plan render directly reflects the quality of the project it represents. That is why selecting an experienced rendering partner – with the technical depth to handle complex geometries and the visual sensibility to produce compelling, publication-ready output – is one of the most important decisions a project team can make.
If you are ready to transform your architectural drawings into powerful, photorealistic 3D visuals that accelerate approvals, elevate marketing, and close deals faster, explore our full suite of expert 3D rendering services at Jytor and take your project visuals to the next level.